*

Account

Welcome, Guest. Please login or register.
Did you miss your activation email?
January 10, 2025, 12:07:55 am

Login with username, password and session length

Resources

Recent posts

[December 27, 2024, 11:15:50 am]

[December 20, 2024, 02:52:42 am]

[December 08, 2024, 11:06:10 pm]

[November 01, 2024, 12:46:37 pm]

[October 05, 2024, 07:29:20 am]

[September 05, 2024, 01:54:13 pm]

[July 16, 2024, 11:30:34 pm]

[March 08, 2024, 12:13:38 am]

[March 08, 2024, 12:12:54 am]

[December 30, 2023, 08:00:58 pm]
Pages: [1]   Go Down
  Print  
Author Topic: The Ultimate Guide to Europe in Ruins: Reinforcements  (Read 17115 times)
0 Members and 1 Guest are viewing this topic.
Unkn0wn Offline
No longer retired
*
Posts: 18379


« on: February 08, 2009, 05:46:31 pm »

Video Tutorial: Coming Soon

So, you've decided to give Europe in Ruins: Reinforcements a shot...  This guide will tell you everything you need to know about setting up your first company, creating battles, installing files, and playing the game.

Step 1: Registering
The first step to being able to play Europe in Ruins: Reinforcements, is simply registering on the forum.
If you haven't done this yet, do so now by clicking 'Register' in the top left menu.
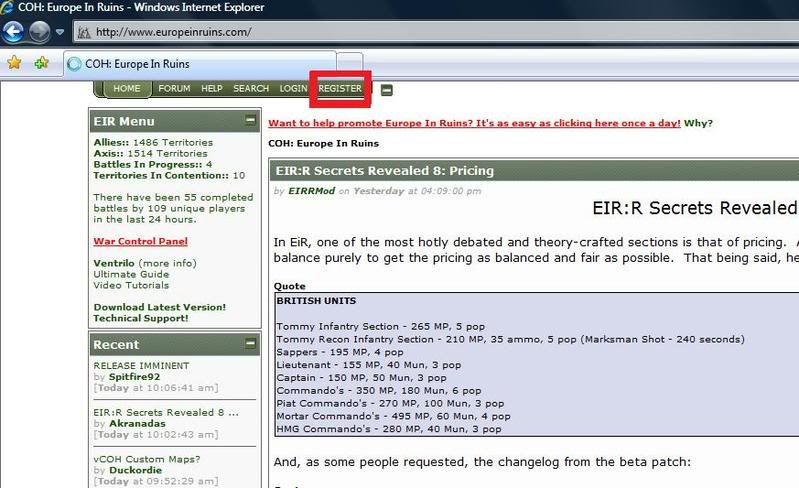


Now that you have registered for the website, allowing you to post on this forum, you will be able to register for the War in order to play. You can register for the war by using the upper left hand menu or by clicking this link: http://www.europeinruins.com/?page=57

Be sure to pay close attention to your Relic Online profile name, it has to be case sensitive!!

Once you have filled in this form, we are ready to move on to the next step!


Step 2: Using the Launcher

First you will have to download the EIRR installer which includes both the game files and the launcher program.
The latest version can be found here: http://forums.europeinruins.com/index.php?topic=275

After downloading, run the installer and install to your main company of heroes directory.

Note that from here on, the launcher will always keep itself and the game files up to date!


Once you've installed, run the launcher and log in. Enter the login information that you have used earlier to register with. (See Step 1) 


When successfully logged in, select the doctrine tab at the top of the screen. Here you get to select both your faction and your doctrine. Choose wisely as you will have to wipe your account or create a secondary in order to play a different faction/doctrine.
Press finalise once you have made your decision.
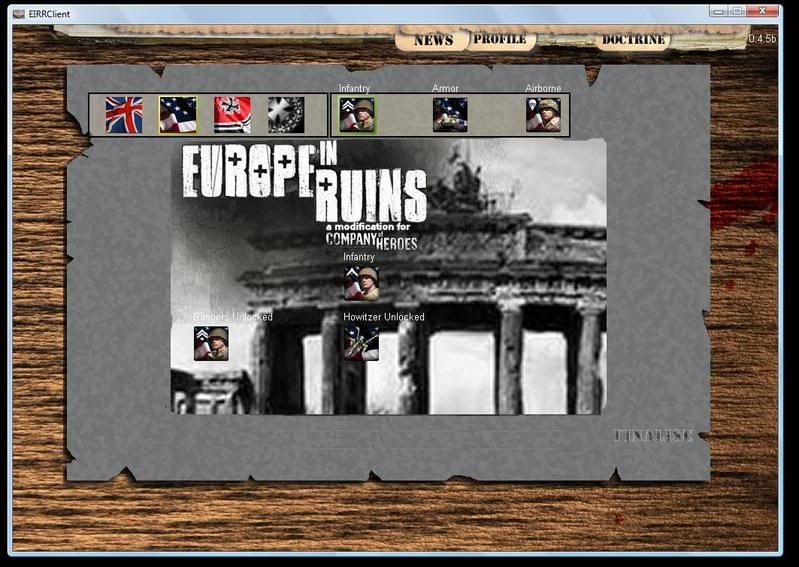


After finalising you will still be on the doctrine screen, note that this time however, you get to select your doctrine abilities and doctrine unlocks. With a fresh account, you will not get to unlock all units/abilities but once you gain more 'Prestige Points' (PP) by playing games you will slowly be able to do so. Again, click on finalise to confirm. Note that the boxes around the selected units and abilities will turn green.
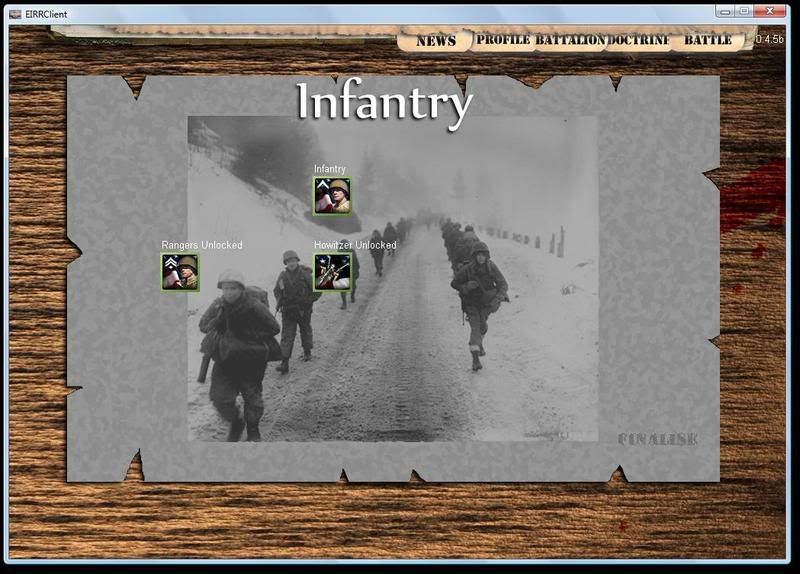


Step 3: Your First Company

Select the 'Batallion' tab at the top, this will take you to the company building screen.

Purchasing Units
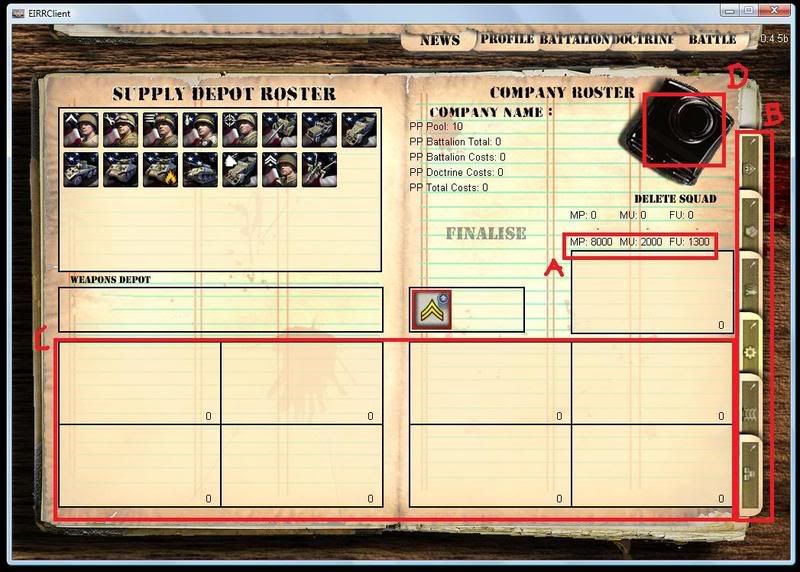


Every player starts off with the same amount of resources, found in A.
MP stands for Manpower, MU stands for Munitions and F stands for 'Fuel'.
You can spend these resources whichever way you prefer although note that there is an 'availability' system in effect which will restrict you from purchasing large amounts of the same type of unit. (More information on this later)

In order to purchase a unit, simply drag that unit's icon to a box in C.
Every box here represents a platoon, note that there are 8 platoons available for every platoon tab.
There are 6 platoon tabs, marked as B on the image. The platoon tabs are there to help you categorise your platoons.
From top to bottom, the platoon tabs or categories are:
Core
Assault
Infantry
Armour
Anti Tank
Support

Every platoon (= 1 box in C) has a max population of 25. Currently there is no minimum population so you can theoretically put single units in platoons. Mind you however that due to 'call-in timers' (= the amount of time it takes for a unit to appear on the field ingame) it is VERY much advised that you build platoons with a minimum population of 8 and a maximum of 12/14. (Obviously heavy tanks and tanks in general have much higher population values and should thus always be put in a single platoon)

Please note that in order to get 'airborne units' (Airbourne ATGs, Airborne and Fallschirmjaegers) to paradrop ingame, you will have to make sure that they are put ONLY in a platoon consisting of other units capable of para dropping. (For example: 2 airbourne squads and 1 Airborne ATG.) Not doing so will result in those airborne units walking onto the field rather than para dropping.

In order to get rid of a previously purchased unit, simply drag it to the area above 'delete Squad' marked as D.


Upgrading Units

When selecting a purchased unit, a number of icons will appear in the 'Weapons depot'. These icons represent all the upgrades available to this specific unit. Mousing over an icon, just as with units, will give you more information on this upgrade.
Select the icon if you want to purchase it, note that a yellow box will appear around the icon.
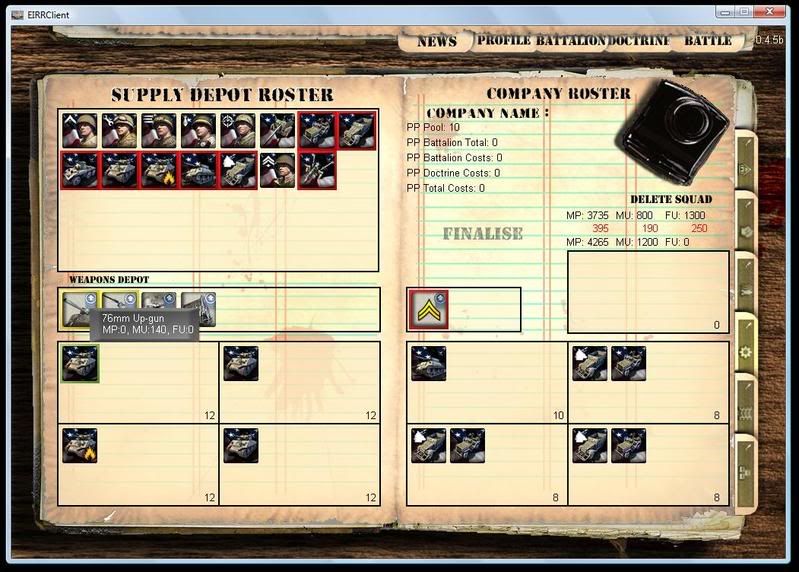


Also note that just like with units, a red box will appear around the icon when you have run out of of the required resources to purchase that specific unit or upgrade.

Click 'Finalise' found in the middle of the screen once you are done.


Step 4: The Battle Room

Please always make sure that before joining or hosting a game, you have set up your company and/or successfully resupplied it after every game. This means that you should try to spend all your resources on a balanced company layout.

Select the 'Battle' tab at the top of the screen. Now you will find yourself in the Battle Room, this is where all players set up rooms or join other rooms in order to play EIRR online.
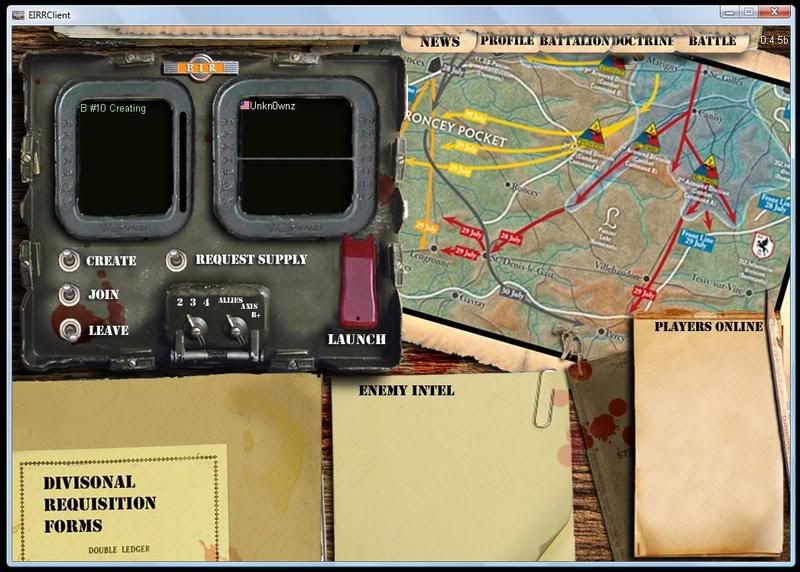


Select a battle from the list, then press join if there is still room for one more.
Or alternatively, click create to set up your own battle.

When creating a battle, the switch with 2, 3 and 4 represents the amount of players on each side.
Currently you have the option of playing either a 2vs2, 3vs3 or 4vs4s. (1vs1s will be made available again later on)
The switch next to that represents the gamemode:  Allies attacking, Axis Attacking or 'Reinforcements', a new gamemode in which two players face off individually before their teammates come in to help them after a certain time period.

Once the game fills up, select 'Request Resupply', this is the Ready button. Note that an S appears next to the names of all players who have readied up.

When everybody has readied up, you'll get a new booklet pop up on the bottom, in later versions this is where in case of 'unfair match ups' the players at a disadvantage will get to select certain in game advantages. Select 'Request Resources' to indicate that you are ready to launch. (RTL will appear next to your name)

When everybody is ready to launch, you'll be able to flick the bomber switch.
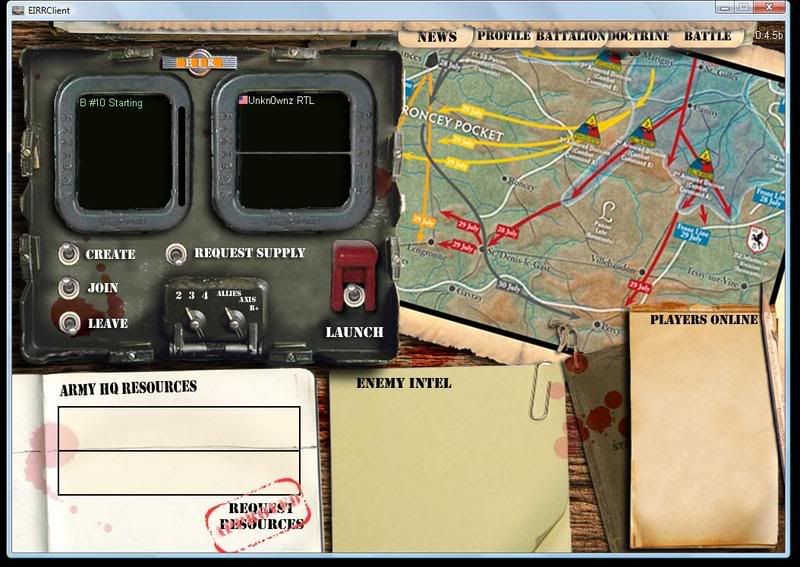


Doing so will automatically download the battle files and launch Europe in Ruins.


Step 5: Time for Action

One person of your game will have to host the game on Relic Online. Usually this is decided in ventrilo or launcher chat. Once the game is hosted, it will be one of the only 'white games' found in the list. Join the game just as you would join a vanilla Company of Heroes game.

You are now ready to play and enjoy Europe in Ruins!

« Last Edit: May 12, 2009, 06:09:33 am by Unkn0wn » Logged
Unkn0wn Offline
No longer retired
*
Posts: 18379


« Reply #1 on: February 08, 2009, 05:46:55 pm »

Here is some additional information on important features found in Europe in Ruins: Reinforcements


The EIRR Victory Condition

Earlier we already briefly mentioned the available game modes. Important to note here however is that these game modes all work with the 'MCP' victory condition. MCP stands for Map Controlled Population and is best described as following: the objective is to hold as many sectors as possible, doing so will increase your pop cap, allowing you to field more troops... and eventually decrease your opponents pop cap (the gain rates on popcap will be shown at the top of the screen).  Whoever manages to push the other opponent off the map or annihilate his opponent wins.

Also note that sectors are captured by simply moving into an unoccupied or enemy sector. Only infantry and support teams can capture sectors. If an enemy unit is present in the sector you are trying to capture, you will first have to eliminate that unit.


Prestige Points (PP)

This system is our representation of your pull and weight within your army's structure.  To have prestige amongst your peers, your quartermasters and your superiors.  To be able to use your earned battlefield experience and reputation to get you what you want, when you want it.  You call in your favors, as in real life, yet need to constantly earn the right to do so.

PP will be gained through combat, just like RBs and CPs were in the past. Note that there is no daily limit to the amount you can earn per day but they will have diminishing returns over the course of a week.

Note that PP is displayed in the 'Batallion' screen.
'PP Pool' is the amount you still have available.


PP are spent on the following:
- Doctrine abilities and unlocks
- Unit Veterancy
- Unit Availability
- Advantages

Below we will shortly elaborate upon 2 'new' and every important PP sinks.

Veterancy

A unit is basically unable to obtain any further vet once it reaches the vet 2 threshold,  It will hover 1 point short of vet 2, unless the player buys the training on a unit per unit basis; aka upgrade the unit to vet 2.  This is repeated again 1 point shy of vet 3.

This training will further the prestige environment by using PP as its cost.  The Prestige cost of the training is also dynamic based on the unit itself, yet once it is finalized it is non refundable in any manner.

Also to note there is not going to be any exp penalties in EIR:R at this time, nor will there be FREE exp for simply owning the unit.  Your units must now earn the exp they gain, and as stated many times in the past we have taken large steps to make units more survivable when it comes to things that previously never had a means to get away and survive a fight.

Training can be purchased in the 'Battalion' screen, select the unit, mouse over the veterancy icon and select it if you want to spend PPs on unlocking that unit's next veterancy level. Obviously you will need to reach the required XP first before being able to purchase the training that unlocks the next vet level.


Availability

EIR:R takes Availability a new direction from the form you saw earlier in Europe in Ruins history. This is a soft capping system. So long as you have the resources needed to buy the unit, you can buy the unit. There are a few terms you will need to know, and understand how they work.

First you have units that are In Reserve. The in reserve number equates to the number of units you have readily on hand at any given time, these do not cost you prestige to purchase. When you purchase a unit past the In Reserve quota, that unit will become In Supply.

Secondly you have units that are In Supply. The in supply number equates to what your division would have in their reserve pool to be drawn on by battalion commanders. There would be fewer units, and it would take longer and be harder to get units from this source, as others are also requesting the same supplies. These troops will cost you an amount of prestige based on the rarity of the unit requested.  When you purchase a unit past the In Supply quota that unit will become Out of Supply.

Thirdly you have units that are Oversupplied. The over supply numbers equates to your ability to beg, borrow and steal from any source you can to get what you need. There is a premium cost involved here and the prestige needed to get these units is doubled from the in supply Prestige Cost. A lot of the heavier vehicles will be out of supply quickly compared to basic infantry types, recreating the feeling that some units are rare in Europe in Ruins and will likely only be seen once in a battle per player.


These numbers and costs do not change as you purchase units.
If you had 2 in reserve, 2 in supply and a cost of 1 pp, this will always be the case even if you lose one in battle. The soft cap is there to make it where you have a dynamic choice in creating your company from the moment you create it to the end of the war.

Example:
Quote
<name, InReserve, InSupply, PP cost>
Jeep, 4, 2, 1

The first 4 purchases of a jeep are InReserve and do not cost any Prestige.  The next two, 5 + 6, are InSupply and will cost you 1 pp each, any further purchases of the jeep are considered Oversupplied and will cost double the PP cost, being 2 for the jeep.  If you play a game, and all your jeeps survive the battle, you will not be recharged for their existence.  If you had bought 7 jeeps and lost 3, you would need to reinvest in the PP cost again to get back into the Oversupplied amount.


Custom Maps

It is very important to note that the majority of all maps played with Europe in Ruins are custom made for the modification.
A large portion, and some of the finest maps our mapping community has to offer, were packaged with your installer allowing you maximum comfort when trying to set up a game. As new maps are released or as existing maps are updated, it will likely occur that you are required to manually download and install a map.

All maps created for use with Europe in Ruins can be found in the map database here:
http://forums.europeinruins.com/index.php?topic=4899.0

In addition, we will also be providing community map packs for all maps that were not included with the installer in the longer run.
[Insert Link Here]

To manually install a custom EIR map simply download the .sga file found in the map database/map's thread and place it into your:
Main Company of Heroes Folder\EuropeInRuins\Archives
(Default = C:\Program Files\THQ\Company of Heroes\EuropeInRuins\Archives)
« Last Edit: May 11, 2009, 04:34:14 am by Unkn0wn » Logged
Pages: [1]   Go Up
  Print  
 
Jump to:  

TinyPortal v1.0 beta 4 © Bloc
Powered by MySQL Powered by PHP Powered by SMF 1.1.9 | SMF © 2006-2009, Simple Machines LLC
Valid XHTML 1.0! Valid CSS!
Page created in 0.094 seconds with 35 queries.